
For a refresher, I decided to host my own WordPress blog on the AWS cloud. This gives me an opportunity to get “hands-on” with various technologies and tools. I was interested in running containers at cloud scale to see if this simplifies stuff. Please check out Cloudy with a Chance of Containers for an architecture diagram and the decisions that drove the design.
While this should have been relatively straight forward, AWS usually has little gotchas where you think you need to make a change “here,” but you really need to change something “waaaaaay” over there. I’ve documented the various gotcha’s and solutions so hopefully you don’t have to feel the same pain.
AWS Elastic File Service (EFS)
Spinning up a file system is as simple as logging into the console and clicking “Create File System.” Make sure to drop it into the proper VPC and subnets. Once created, you will need to seed it and make sure the permissions are set correctly. I spun up an EC2 instance to do this initial work, then terminated it once I was done. Also make sure your EFS security group allows access to your EC2 instances.
# Need the nfs client stuff
sudo yum install -y nfs-utils

# Make our mount point.
sudo mkdir /efs

# Mount (substitute your AWS EFS dns entry)
sudo mount -t nfs4 -o nfsvers=4.1,rsize=1048576,wsize=1048576,hard,timeo=600,retrans=2 put-aws-efs-dns-here:/ /efs

# Create our group and our user and explicitly set
# the id's.  We're doing this because the container
# image will use the same id's, and NFS will be happy
sudo groupadd -g 300 www-data
sudo useradd -u 300 -g 300 www-data

sudo mkdir /efs/wp-content

# download WP, unpack, and copy the ./wp-content
# to /efs/wp-content
curl -o wordpress.tar.gz https://wordpress.org/wordpress-4.9.2.tar.gz
tar -xzf wordpress.tar.gz
sudo cp -R ./wordpress/wp-content /efs/wp-content

# Set the permissions. This will assign the
# user-id and group-id values. When our container
# mounts the id's will align and everything will
# be groovy
sudo chown -R www-data /efs/wp-content
sudo chgrp -R www-data /efs/wp-content
AWS Elastic Container Service (ECS)
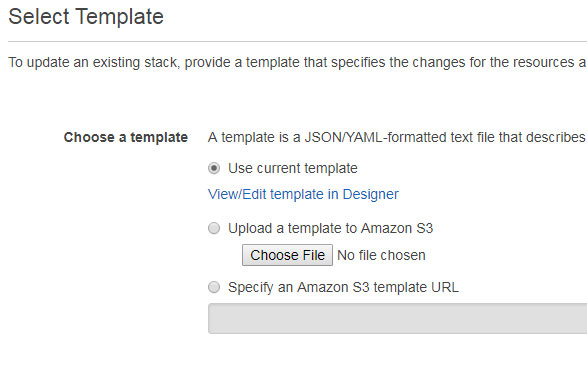
You need an EC2 instance to host the container images. You somehow need to instrument the EC2 boot process to tell it to mount your EFS file system target. The AWS documentation says to put it in your EC2 UserData section, but the ECS cluster doesn’t use this. Instead, as part of the ECS cluster creation, it creates a CloudFormation stack. You will want to select your stack, then use the View/Edit template in Designer option.
The next gotcha is the AWS documentation says you need to use a cloud boothook so you mount the EFS filesystem before Docker gets started. The example shows a multipart MIME script, but when you try to stick this into your CloudFormation template, the YAML parser starts getting cranky. I spent a good amount of time trying to figure out how to escape the strings to make YAML happy, but YAML beat me down. I stumbled across a GIST that had a good example of how to configure an ECS cluster to automatically mount an EFS file system.
When you setup your cluster, assign a ssh key-pair so you can test/debug things. Scale up the cluster to 1 instance, ssh into it, and make sure it mounted correctly (df -T). If it did not mount make sure your security group permissions are correct.
AWS Application Load Balancing/Target Groups
This is the call path when someone opens their browser: web request–>ALB–>EC2 instance–>Container. Some background and a couple of things to note:
- When you write socket software, you can only listen on a distinct unused port. This means if I grab port 80 in my software first, and then you try to use port 80 in your software, it will fail for you (sorry about that, but winner takes the port.)
- There is some port forwarding/network mojo going on between the EC2 instance and the Docker container image it’s hosting. That’s why you can do mappings like “EC2 instance on 80 to container instance port 80.”
- When ECS successfully spins up another container (task), it will handle registering it with the ALB’s target group. This is the step that allows traffic to flow through the call path.
The short story is don’t assign a host port when you are editing your container. It wasn’t entirely clear from the AWS documentation, and the little “info” button doesn’t tell you “Dude, you really want to dynamically assign host ports – so default to 0.” Otherwise, if you assign a port, you just limited your task scalability to 1. Why? See #1 above.
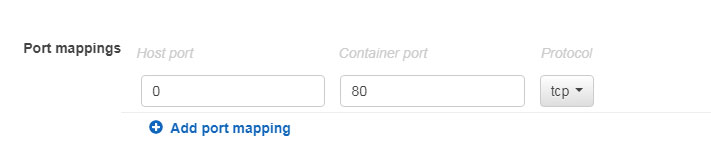
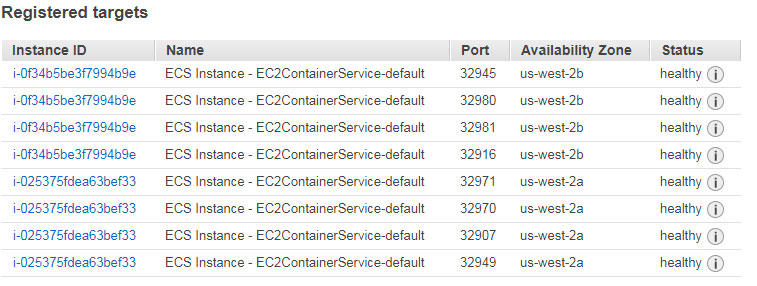
I want my WP tasks to scale horizontally within an EC2 instance (and across instances in the cluster.) So I am using dynamic port assignments, which you can see when you look at your target group and inspect the registered targets.
I am sharing the gotchas I had to work through to get WP running in ECS. This isn’t meant to be a complete how-to containerize WP and run in AWS. However, Tomaž Zaman wrote some excellent articles I used as a reference.
- WordPress Developer’s Intro to Docker, Part One. This is an introduction to Docker and the basics of containers.
- WordPress Developer’s Intro to Docker, Part Two. Part Two is about building a portable container image that you could use throughout your SDLC pipeline (dev/test/stage/prod).
- WordPress Developer’s Intro to Docker, Part Three. Part three is the final part of the series about a production deployment to Google Cloud using Kubernetes.